Friday, November 30, 2012

Big Kitty Stretch

click to enlarge

I fell in love with this sofa years ago.  And it was like a muse.  I painted numerous dogs and cats lounging around on it.  I was doing art fairs at the time.  And none of my work was scanned and saved.  I was just selling the originals.  So some of my favorites are dog gone.  

Stretch is the theme of the day at www.illustrationfriday.com

And I have some news.  Lisa over at Adventures in Blue Ridge Mountain Living and Arnoldo at A Blog To Read, Explore and Create won my illustrated book giveaway!  Thanks for playing guys. I always enjoy my visits to their happy and creative blogs.  


Wednesday, November 28, 2012

Dark Chocolate Pumpkin Swirl Bundt Cake


This is my first downloaded pinterest recipe.  I know a lot of people collect food porn photos. The kind of professionally decorated and unachievable food perfection only prepared by Martha types.  But I only pin food photos and links that I might actually make.  Someday...  Here is the recipe:

Cake:
  • 1 1/4 cups pumpkin puree
  • 1 cup sugar
  • 1 cup packed dark brown sugar
  • 1 1/2 cups unsalted butter, softened*
  • 5 large eggs
  • 1 tsp. vanilla
  • 2 3/4 cups cake flour, divided
  • 3 tsp. pumpkin pie spice
  • 1 tsp. baking powder, divided
  • 1/2 tsp. baking soda, divided
  • 1 tsp. salt, divided
  • 3/4 cup Dutch-processed unsweetened cocoa
  • 1 1/3 cup regular or low-fat buttermilk, divided
Cream Cheese Glaze:
  • 1/2 cup powdered sugar
  • 4 oz. (1/2 cup) regular or low-fat cream cheese
  • 1/2 tsp. vanilla
  • 3-4 tbsp. milk (or more if you want a thinner glaze)
Process
  1. Preheat oven to 350 degrees (F). Rub a 10 inch tube pan or 12-cup bundt pan with butter (or spritz with cooking spray) and dust with 1 tbsp. flour until the interior is covered. Tap lightly to shake loose extra flour. Set aside.
  2. Spread pumpkin puree over two layers of paper towels and press two more layers on top. Let sit for 10 minutes.
  3. Meanwhile, in a large mixer bowl cream butter until light. Add both sugars in a steady stream and mix on medium for about 5 minutes.
  4. Add eggs, one at time, mixing well after each. Add in vanilla.
  5. Transfer half of the mixture into another large bowl (another mixer bowl would be helpful, but any large bowl will work). Set aside.
  6. Scape the pumpkin off of the paper towel and add it to the first bowl. Mix well.
  7. In a smaller bowl combine 1 3/4 cup flour, pumpkin pie spice, 1/2 tsp. baking soda, 1/4 tsp. baking powder and 1/2 tsp. salt.
  8. Add half of the flour mixture to the pumpkin mixture and mix well. Mix in 1/3 cup buttermilk. Then add the remaining flour and mix until combined. Set aside.
  9. In the smaller bowl combine 1 cup flour, 3/4 cup cocoa, 1/2 tsp. baking soda, 1/4 tsp. baking powder and 1/2 tsp. salt.
  10. Add half of the flour/cocoa mixture to the other large bowl and mix well with a whisk or your mixer. Mix in 1 cup of buttermilk. Then add the remaining flour and mix until combined.
  11. Spoon 1/3 of the pumpkin batter into your prepared pan. Drop heaping spoonfuls of the chocolate batter around the pan (not completely covering all the pumpkin). Spoon in the remaining pumpkin and chocolate batters. Gently swirl a knife around the pan several times.
  12. Bake for 45-55 minutes or until a toothpick inserted in the center comes out with a few moist crumbs (make sure you’re checking in both the pumpkin and chocolate parts, I noticed large chocolate sections needed a few additional minutes). Cool in pan for 10 minutes, then remove from pan and cool for another 10 minutes on a rack.
  13. Meanwhile, to make the glaze, mix powdered sugar and cream cheese until well blended. Beat in vanilla and milk, 1 tbsp. at time. Drizzle on the warm cake. Let cake cool completely.
Sharon's notes:  I reduced the sugars to 3/4 cup for each batter.  And also glazed it with a chocolate ganache instead (not shown)  For my Ganache you just bring around 1/3 cup of 1/2 and 1/2 just to a simmer.  Imediately remove from the heat and add around 2/3 cup bittersweet or semi sweet chocolate chips.  Stir until smooth and glossy.  Then glaze your cake.  


Enjoy!

Monday, November 26, 2012

Feather Inspiration...


I thought my latest sewing project would be the perfect follow up to last week's bird post. I'd been planning to make a new purse all Summer.  Then my husband picked up this blue jay feather in our yard and inspiration finally struck.

My Webe purse did not have enough pockets.  And you can never have too many pockets I say.  Plus it didn't survive the wash.  But I used it as a pattern of sorts.  And I used the pillow shams from my old denim love seat for fabric.  We gave away the love seat when we redecorated our house.  But the pillow shams were brand new and had never been used.  My denim pockets rug is the backdrop for this post! Of course, I didn't do this project on my own.  There is never a shortage of help.  The feline variety.

Making pockets.

I used a piece of fabric that my Mom gave me a long time ago for the contrasting top.  I sewed the two pieces together for a purse front and back.

Pockets.  I drew the loop pattern on the denim with colored pencil.

I painted my inspiration feather on with fabric paint.  Then ironed it to seal the deal.

Then I sewed the pockets on the back.

I sewed on the feather emblem.

I sewed the pockets onto the lining fabric.  I had this fabric on hand from some curtains I made a long time ago.  In fact, I didn't buy one thing for this whole project.  Not even the zipper! 

Here I'm sewing on the strap. It is also made from an old curtain.

The inside.  I used the zipper from one of the pillow shams.  


So far I LOVE this purse.  It is so light weight and handy with all those pockets.  Now I just need another feather to inspire a Winter purse.  I'm thinking cardinal...

Friday, November 23, 2012

Why Whiskers?

click to enlarge

Boy, today was an easy day over at www.illustrationfriday.com  I could just close my eyes and put my finger anywhere in my virtual art files and hit a whisker.  The only reason I picked Pink Kitty is that I don't think she has made an appearance on my blog before.  She may look curious, but she is actually rather shy. 

 On a side note, it just occurred to me that if anyone were to hit my labels for cat they would be in for the long haul. 

 And with a twitch of a whisker and a splash of smelly drool, the cat left.   

Wednesday, November 21, 2012

Lefse Demo 2012!

 I'm re-posting one of my first recipe posts.  Making Lefse is kind of a lost art.  I know I never paid attention when my Mom would make it.  But years later she would be proud to know I've taken up the lefse paddle!  So I'm spreading the word once again.  Now let me teach you a little something about lefse...


You start with potatoes and a ricer like this. The recipe calls for 5 cups of peeled, cooked and riced potatoes. I never measure. I just used a container of potatoes from the farmer's market. Plus...


1/2 cup half and half


1/2 cup butter


4 tsp sugar


1 tsp salt


2 cups all purpose flour


While the potatoes are still hot, stir in the milk, butter, sugar and salt. P.S. I used cooled potatoes and melted butter last time and it turned out fine. But if you use hot potatoes, cool the mixture before making lefse.


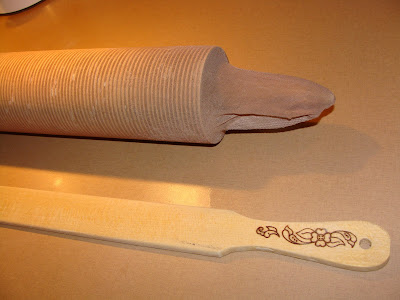
You will need these tools as well. I cover the rolling pin with a clean nylon. (It's just what you are supposed to do :)


Now split the potato mixture in 1/2 and add 1 cup of flour to each with a pastry cutter.


Roll each batch into balls. I make mine smaller because my griddle isn't that large.


You'll need time, patience and lots of extra flour for rolling. Use a lefse stick or long spatula to gently lift and transfer the lefse to the griddle. Rerolling seems to work fine. And if it breaks slightly just push and mold the dough back together with your fingers. It will be fine. And it still tastes good if it doesn't roll as thin as you would like it to. 


P.S.  I had the T.V. on in the other room when I started making my lefse. By the time I was completely covered in flour with sticky lefse hands a horrible and ANNOYING cartoon came on. So don't forget the soothing music instead! I don't know how I managed to take photos of all this actually. But having a damp cloth to wipe your hands on isn't a bad idea.


Cook briefly on each side. Till it browns a little and bubbles slightly.


Transfer to a sheet to cool. Look at all that delicious lefse! It is so darn good. Like a tortilla on steroids. I always reheat my lefse on a pan or in the microwave and serve it with lots of butter. You can make sandwich rolls and meatball wraps topped with gravy. My husband likes it with cinnamon and sugar. And you don't have to be a Norwegian (like me) to make it.


HAPPY THANKSGIVING!


Monday, November 19, 2012

Their goose is not cooked...


I'm finally re-visiting Duluth and Hawk Ridge.  These birds are captured, but they don't end up on the Thanksgiving table.  They are banded and released.  Their goose is not cooked!

A volunteer showcases a blue jay's feathers.  This is an exciting (I'm joking.  Most people don't like Jays) part of the Hawk Weekend Festival September 14-16.  www.hawkridge.org   It celebrates the Fall migration of birds with bird adoptions, among other events. In short, Hawk ridge is such a great spot for banding because the birds don't want to fly over Lake Superior as they migrate.  I don't blame them one bit. And for a small fee you can hold and release a captured bird.  Jays are free.  Just kidding.

 A young Flicker.  We see these woodpeckers on the ground in the Fall.


An alert Kestrel.  


Wasn't it fun to see their feathers from all sides? A brief demo and off they go.  Where migration will take them no one knows. 

If you haven't checked out my giveaway either scroll down or click here  I'm giving away 2 signed copies (including musical cd's) of my first illustrated book.  It would make a great Christmas gift!

Friday, November 16, 2012

Zoom

Mary the Fairy and Billie the Bee

I almost didn't post today for www.illustrationfriday.com  I really didn't have anything great for zoom.  Except this old thing.  And I'm not talking about the sweat pants that I happen to be wearing.  But I always enjoy the treasure hunt of digging something up each week.  Sometimes it is my latest and greatest.  Other times it is like discovering the favorite sweater that you forgot to unpack from a suitcase.  It still makes you feel warm and fuzzy just looking at it.  And then there are times when you dig up a moth eaten old rag.  

But do you know what?  I usually end up posting those rags anyway.  And do you know why?  Because one person's garbage might be another's treasure.  You never know. 

And while you are here be sure to scroll down and check out my first illustrated book giveaway.  Or click Book Giveaway for the scoop.  I'll be drawing names in a couple weeks. It would make a great Christmas gift.

Wednesday, November 14, 2012

Broccoli Pizza with Pizzaz!


This is a very deceiving recipe.  It sounds so healthy and boring.  But when I made this recently, my husband stated that it was one of the best pizzas I've made.  And no meat!  The secret lies in just a few simple but tasty ingredients.  

First you must start with a good dough or purchased crust.  You'll find a recipe and demo for my homemade pizza dough under my labels for pizza and my Meal of choice for death row post!  Follow the directions and pre-bake your crust for around 10 minutes at 450. I use a metal pizza pan with holes.  I always pre-bake the crust because I like it crispy. 

 Now you are ready to top it with just a few  important ingredients.  Pour and spread a generous amount of extra virgin olive oil on the pre-baked crust.  Now mince 2-3 garlic cloves.  Depending on how much garlic you desire.  Spread the minced garlic evenly over the whole oiled crust.  

Now sprinkle a small amount of your favorite cheese blend.  I used a Cheddar/Mozzarella pizza blend.  Now it is time for the broccoli.  You can see how I chopped the veggie into small pieces.  Be generous!

Now sprinkle on a generous amount of grated Parmesan and some freshly cracked pepper.  


That's it!  Bake for around 10 more minutes at 450.  Add a little more pepper, parm and sea salt if you desire and enjoy the simple goodness.

P.S.  I'm posting this recipe for my friend Danielle.  I hope to hear that you have made it soon!

Monday, November 12, 2012

Double Giveaway!


I'm giving away two signed copies of my first illustrated book, "Mary Rode To Bethlehem on Me"  And If you are the winners I'm throwing in two CD's of music that accompany the book.  The poem like Christmas story written by Ivan Jensen is very sweet.  The donkey has lots to Hee Haw about.  And so do I.  I'm so excited to have copies of my first book out in the world.

All you have to do to be eligible is start following my blog (in the side bar) if you haven't already.  And leave a comment that you are interested in the book and CD.  I'll collect names through the month of November.  And give shout outs to remind people about the giveaway.  Then in December I'll draw two winners and send them an early Christmas present.  In fact, you can let me know who you would like the book signed to. The book would make a great gift.  

Baaa, Hee Haw and Good Luck!

P.S.  Small business Saturday is November 24th!


Friday, November 9, 2012

My kind of trees.

click to enlarge

A long time ago in a far away place I did a little thing called the Fiction Project for Art House Co-op.  I wrote and illustrated my own little journal with the theme Over the Top.  I filled it with illustrations and story observations about my beloved vacation destination Costa Rica.  And called it, There's an Iguana on my Roof.  These three illustrations have eluded my blog until now.   


But with the www.illustrationfriday.com theme tree I thought it was the perfect choice.  Palm trees are close to my heart.  And if there is an Iguana on my roof and it is 90 degrees outside, even better.

P.S.  To see all the illustrations and Costa Rica love stories click on the fiction project icon in my side bar.

Wednesday, November 7, 2012

Yummy Chow Mein Hotdish


Thanks to the fried onions, this hotdish actually looks tasty.  Food photography is hard! Here goes another double or triple hotdish recipe. 

First cook the rice according to the package directions.  I use 1 cup raw white rice and 1/2 cup raw wild rice.  The wild rice takes quite awhile to cook so I usually make extra and freeze it for the next time I need it in a recipe.  Now saute 1 pound ground beef , 2-4 stalks of chopped celery and 1 diced onion until browned. Drain. 

Add the cooked beef mixture and both rice varieties to a large mixing bowl.  Now add 1/2 tsp pepper, 1 can drained mushrooms and 1 can cream of celery and 1 can cream of mushroom soup.  I sometimes add cream of chicken/mushroom. And I usually use at least 1 can of reduced fat and low sodium soup. That's it.

  It will make two -three smaller hotdishes.  I bake one and freeze one.  Bake at 350 for around 30-45 minutes uncovered. (1-1&1/2 hours for a frozen hotdish) Then add the most important ingredient.  French's Fried Onions.  Then Bake until brown.  My Mom used to make a similar chow mein hotdish.  She would always bring it to family potlucks.  My Dad was such a picky eater that he would only eat my Mom's food!  She always used fried chow mein noodles on top.  But the fried onions make it even yummier!     


Sprinkle on some cracked pepper and Kikkoman Soy Sauce and enjoy.

Monday, November 5, 2012

Halloween is for the birds...


We watched The birds last week.  And when I say "we" I mean the adults and our naughty feline Hana.  She was very intrigued with Tippi.   Hmmm.  Why would that be?  Great minds think a like. 

Tippi..."I hope a bird doesn't swoop down and steal my cig"

  Hana..."When I look at her beautiful face I just think birds, birds, birds!"


Nice purse.


"Don't leave Tippi!"     


Now we are talking. Tastes like chicken.  Drool.


"The bleeping mother load.  This is the best movie I have ever seen.  But I thought you said it was a scary movie?  It is obviously a fantasy foodie show deserving top billing on the food network.  Thanks Hitch!"  

P.S.  To elect more cats visit www.gattinamycats.blogspot.com and don't forget to vote today!